
WordPress 网站的文章如果比较长,通过文章目录,可以方便用户阅读,对读者比较友好。而且锚点文章目录据说会被搜索引擎收录,对网站SEO有利。
为网站文章添加目录一般可以通过代码或者插件来实现,用插件的话就比较简单了,直接通过网站后台下载安装即可。常见的目录插件主要有Easy Table of Contents(简单的目录)、Table of Contents Plus 和 LuckyWP Table of Contents,如果想用国人开发的插件,可以试试WPJAM Basic。WPJAM Basic 插件是“我爱水煮鱼”开发的一款多功能合一的WordPress 全站优化插件,其中包含了文章目录功能。如果您嫌麻烦,小编推荐用这款插件。如果您只需要用目录功能,可以试试“我爱水煮鱼”早期提供的单独的目录插件——wpjam-toc。
wpjam-toc 下载
该插件大小只有8kb,可谓小巧强悍。
https://url26.ctfile.com/f/948726-515196904-501647?p=7890(访问密码:7890)
注:如果您网站设置了外链自动在新标签打开,就不要使用wpjam-toc 了,那样点击目录会打开新标签(正常应该在当前页跳转至目录对应位置),WPJAM Basic 没有这个问题。
当然,如果您不喜使用过多的插件,下面我们来看看如何用纯代码来实现为WordPress 网站文章添加目录。
纯代码方法
php功能代码
此代码复制到当前主题的functions.php文件中即可。
// 文章目录
add_filter('the_content', 'my_contents_table');
function my_contents_table($content)
{
    $matches = array();
    $ul_li = '';
    $r = '/<h([2-6]).*?>(.*?)</h[2-6]>/is'; // for SEO-friendly, contents table only identify <h2> ~ <h6>
    if (is_single() && preg_match_all($r, $content, $matches)) {
        $preValue = 2;
        $hStack = new SplStack();
        foreach ($matches[1] as $key => $value) {
            $title = trim(strip_tags($matches[2][$key]));
            $content = str_replace($matches[0][$key], '<h' . $value . ' id="title-' . $key . '">' . $title . '</h'. $value . '>', $content);

            // The following part implements the hierarchy of contents table
            if(!$hStack->isEmpty()){
                if($hStack->top() == $value){
                    $ul_li .= '<li><a href="#title-' . $key . '" title="' . $title . '">' . $title . "</a></li>n";
                } elseif($hStack->top() < $value){
                    $ul_li .= "<ul>n" . '<li><a href="#title-' . $key . '" title="' . $title . '">' . $title . "</a></li>n";
                    $hStack->push($value);
                } elseif($hStack->top() > $value){
                    while($hStack->top() > $value){
                        $ul_li .= "</ul>n";
                        $hStack->pop();
                    }
                    $ul_li .= '<li><a href="#title-' . $key . '" title="' . $title . '">' . $title . "</a></li>n";
                }
            } else{
                $ul_li .= '<li><a href="#title-' . $key . '" title="' . $title . '">' . $title . "</a></li>n";
                $hStack->push($value);
            }
        }
        $content = "n<div id="article-index">
            <div id="article-index-title"><strong>文章目录</strong></div>
            <hr id="article-index-hr" />
            <div id="article-index-table"><ul id="index-ul">n" . $ul_li . "</ul></div>
            </div>n" . $content;
    }
    return $content;
}
css样式代码
此代码放入当前主题的默认.css文件中即可。
#article-index {
    float: right;
    width: 250px;
    line-height: 23px;
    margin: 0px 0px 20px 20px;
    border-radius: 5px;
    border: 2px solid rgb(36, 40, 45);
    padding: 0 0 6px 0;
}

#article-index #article-index-title {
    margin: 5px 0 0 0;
}

#article-index #article-index-title strong {
    display: block;
    line-height: 30px;
    padding: 0 4px;
    text-align: center;
}

#article-index-hr {
    size: 1px;
    color: rgb(36, 40, 45);
    margin: 4px 20px;
}

#article-index-table {
    padding: 0 22px 0 20px;
}

#article-index ul {
    padding-left: 20px;
}

#article-index li {
    list-style-type: disc;
}

#index-ul {
    margin: 0;
}
#index-ul li {
    background: none repeat scroll 0 0 transparent;
    padding: 0;
}
#index-ul a {
    color: rgb(36, 40, 45);
}
#index-ul a:hover {
    color: rgb(61, 138, 125);
}
到此就可以为文章添加文章目录功能了,如果您的主题设置支持自定义代码,上边的PHP代码和css代码也可以直接放到后台主题设置中,这样还省了升级主题后重新添加代码的麻烦~是不是也挺简单的呢?
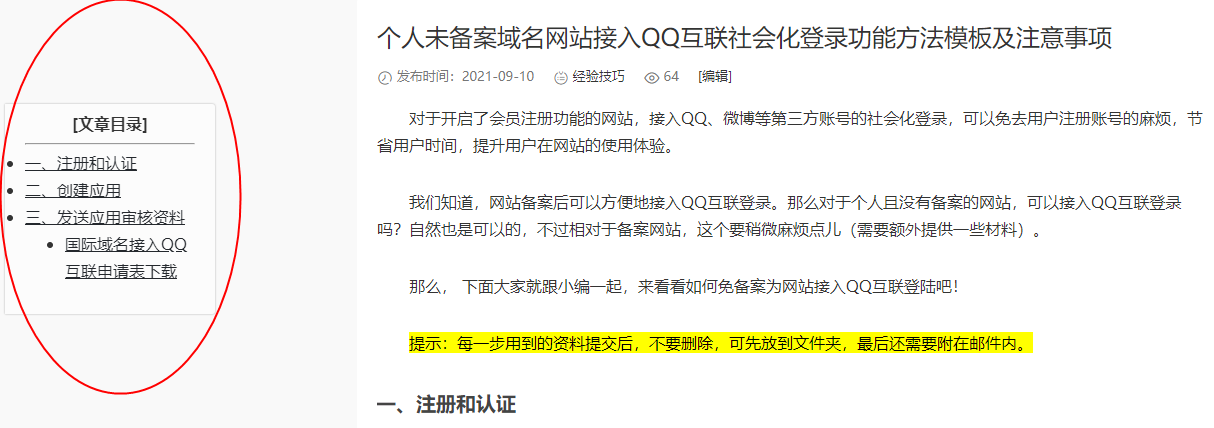
不过此时目录显示位置为文章的右上角,且在modown主题中,不同层级的目录之间错位较厉害,看着不太舒服。如果想要文章目录在左侧边栏显示,并且调整一下不同层次标题之间的位置,就需要对css代码进行一些修改了,最终效果见下图:
自用css代码
适用于本站目前使用的Modown主题,其他主题未测试,可能仍需要进行适当修改。
/*目录效果*/
#article-index {
position:fixed;
left:5px;
width: 210px;
background-color:rgba(255,255,255,.55);
border-radius: 0 3px 3px 0;
box-shadow:0 0 2px #aaa
}


#article-index #article-index-title {
margin: 5px 0 0 0;
}

#article-index #article-index-title strong {
display: block;
line-height: 30px;
padding: 0 4px;
text-align: center;
}

#article-index-hr {
size: 1px;
color: rgb(36, 40, 45);
margin: 4px 20px;
}

#article-index-table {
padding: 0 22px 0 20px;
}

#article-index ul {
// padding-left: 20px;
}

#article-index li {
list-style-type: disc;
}

#index-ul {
margin: 0;
}
#index-ul li {
background: none repeat scroll 0 0 transparent;
padding: 0;
}
#index-ul a {
color: rgb(36, 40, 45);
}
#index-ul a:hover {
color: rgb(61, 138, 125);
}
PS,文章目录调整到侧边栏后,在手机端会遮挡文章内容,因此我们还需要修改下PHP代码,在移动端不显示文章目录。
我们把上边的PHP代码的第一句
add_filter('the_content', 'my_contents_table');
改为
if ( !wp_is_mobile()){
add_filter('the_content', 'my_contents_table');
}
就可以了。


评论0